
Holes and Glug
ARRRRGGHHH!!!! My bread has a whopping huge hole in it. Does this sound familiar? This next section is devoted to holes and glug, why they form and how we can prevent them (well the majority of them).
Holes
Before we can remedy the hole situation we need to know what sort of hole we are dealing with. Holes can be caused by or are made larger by;
1.Steam leavening during baking
2.The shape and size of the baking tin relative to the amount of dough present
3.Proofing times
4.A high hydration percentage
5.Insufficient mixing of the dough
6. Amount of viable yeast
7. Drying out of the top of the dough
8. The direction of the heat source during baking (it's a possibility)
Update - November 2017
9. The way it is mixed
1. Steam Leavening
A leavening agent is something that makes dough and batters rise usually by the release or trapping of gases within these mixtures. Leavening can occur prior to baking or during baking and some other leavening agents are; bicarbonate of soda, yeast, beaten egg whites and baking powder. Steam leavening occurs during baking, is dependent on the presence of water in the dough and is unpredictable.
Dough made with Bakers' Magic Gluten free flour requires a higher hydration percentage relative to similar products made with wheat flour. In addition the ability to trap gasses is different in dough made with Bakers' Magic Gluten free flour when compared with dough made with flour containing gluten (There are no surprises here! – there are positive aspects to this ability). Basically a higher hydration percentage and a lowered ability to trap gasses means the potential is there for some really “fantastic” holes due to steam leavening.

I have included a photo of what I call Glug (above). Glug is the product when the Bakers' Magic Gluten free flour is baked with the usual amount of water, sugar and salt but without any leavening product - so no bicarbonate of soda, no yeast, no beaten egg whites and no baking powder. Any holes present should be attributable to steam leavening. The holes will have occurred during the baking process as a result of steam build up due to the water content of the mixture. They are randomly dispersed and can be of varying sizes. Really large holes are probably the result of the amalgamation of smaller ones.
This next photo is a small bun of the Bakers' Magic Gluten free flour using baking powder as a leavening agent (cooked at the same time as Glug). Once again the larger holes are probably due to steam leavening while the bread is baking. The difference in the crumb of the two buns is due to the leavening power of baking powder. By simply adding a leavening agent to the mix the steam generated during baking is more evenly distributed. When the steam is more evenly distributed in the dough, the holes will be smaller in the baked product (theoretically).

Steam leavening may be unpredictable in its ability to produce holes however one way the larger holes can be minimised is ensuring the viable yeast are evenly distributed throughout the dough.
2. The shape and size of the baking tin relative to the amount of dough present
The following photo is of “wholemeal” bread; the same mixture was either baked in a tin (left) or baked as a free standing cob (right) at the same time. Although there are holes in the bread from the tin I view these as acceptable. The holes are relatively uniform in size and distribution and glug is absent. The same cannot be said for the massive cavern and resulting glug underneath it in the cob loaf. The major difference between the two loaves is that the one containing the large hole (cavern) was not baked in a tin.

Creating Caverns
The contributing factors to make this type of hole (cavern) are the production of steam, the elasticity of Bakers' Magic Gluten free flour and the ability of the dough to trap gasses. With high hydration percentages, an ability to expand substantially and an imperfect ability to trap gasses this type of hole can occur frequently if the conditions are right for the holes formation.
Why/how do they form?
In this instance they form when the baking process is not fast enough to stop the amalgamation of steam bubbles. Hot air rises, so too does steam, this is the reason that these huge holes are usually just below the crust. Most of the holes present in the loaf baked in the tin (pictured above) are “pointing” upward. They are in their current position as they were trapped there during the baking process. When the bread is being baked in a tin the dough will rise up and out to the sides of the tin. Once it reaches the side of the tin (which is hot) a crust will start forming, the dough will start baking and the unbaked dough will only be able to rise upwards (it will be the middle of the loaf that continues to rise) during baking. The sides of the tin are restricting the movement of the dough and at the same time transfer heat to the dough.
When the bread is being baked as either a free standing loaf (for example a cob) or in too large a tin for the amount of dough there is no physical constraint on the sides of the loaf. This could also happen if there is too much dough in the tin for instance if it overflows during proofing. As the temperature of the dough rises and steam starts to be produced the dough will expand and start rising and has the capacity to expand substantially before a hard crust has formed. The outside of the dough does not have the same heat transfer as baking in a tin or the constraint. All the dough can expand upward which tends to bring the steam/gas bubbles into closer proximity to each other. If the dough is still fluid at this stage then amalgamation of the bubbles will probably occur. As the bubble (cavern) increases in size and the crust has already formed the bread below the bubble will be squashed. The resulting loaf will have a huge hole (cavern) below the crust and some glug underneath the hole.
Minimising the Cavern
Use heavy, good quality baking tins.
Prior to baking gently prick the top of the proofed dough with a skewer to help release any air pockets.
Decrease the hydration percentage if baking a free standing loaf.
Shape the free standing loaf into a cigar shape rather than round. Of all shapes the middle of a round loaf will take the longest to bake.
If baking round loaves; divide the dough into smaller portions and decrease the hydration percentage.
Bake buns in a large muffin tray.
Increase the oven temperature slightly (before doing this I would check the oven temperature – most kitchen shops have oven thermometers).
3. Proofing times
This section focuses on how proofing times affect hole formation; the factors affecting proofing are discussed in Fermentation/Proofing.
The Formation of Zeros
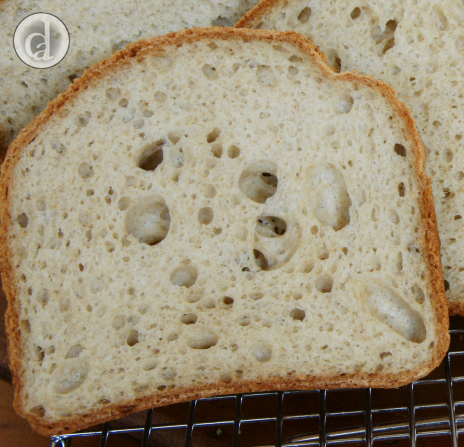
As previously stated if no leavening agent has been added to the dough glug will be the result. By adding activated yeast to the dough prior to baking the initial production of carbon dioxide will allow some expansion of the dough but this will be insufficient to allow uniform dispersion of the generated steam during baking. This will of course depend on the hydration percentage of the dough. Carbon dioxide is already a gas & the volume will expand slightly as the temperature rises but not as much as water turning into steam. The volume can increase by approximately 1600 x. The photo below is of a loaf (120% hydration) baked in a tin immediately after mixing. There has been insufficient time for the amalgamation of the holes to form a Cavern and so the resulting holes (Zeros) are randomly distributed in the interior of the loaf.
What happens if the dough is proofed, punched down then shaped & baked - without a second proofing? The dough essentially has the same volume of water in it as it did before the first proofing. If all the gas has been knocked out of the dough then theoretically zeros should form during baking. The following photo is of a bread I baked after proofing the dough for 1.5 hours, knocking/punching all air out, putting it into a baking tin and baking immediately. There are some pretty impressive zeros in the loaf. The difference between this loaf & the one pictured above was in the flavour of the bread. The yeast flavour was more pronounced in the loaf pictured below.

It is relatively easy to minimise the formation of zeros - proof for longer than 15 mins, at an appropriate temperature, in the shape to be baked.
There may be times, however, when you want some zeros in your bread. Last year (2013) I bought some Artisan bread crackers (sprinkled I think with Himalayan pink rock salt) that had holes in them. Remember these were wheat based. The packet contained 100 g of crackers and was $11 (AU). Artfully added holes can make items expensive!
4. A high hydration percentage
The size & number of holes increase with increasing hydration percentages. Care needs to be taken when baking breads with greater than 140% hydration (this equates to 630 ml of water per 450 g of Bakers' Magic Gluten free flour). Hydration percentages are discussed in the section on Water.
5. Insufficient mixing of the dough
Insufficient mixing of the dough can result in bread that contains some glug & some holes. Their position in the final product can be anywhere. The dough needs to be uniformly smooth. If some of the dough is "harder" than the rest the dough hasn't been mixed enough. The harder dough will contain less water than the rest of the dough. The bigger the clump of hard dough the higher the hydration percentage of the rest of the dough. Which in turn can create more holes. In the baked product the harder dough will be glug. It is unlikely that insufficient mixing will occur when the dough is mixed in a Thermomix.
6. Amount of viable yeast
I have discussed in the section on Glug what happens if the yeast aren't viable when making bread but what happens if some of the yeast are viable. Another way of looking at this is by decreasing the amount of yeast in a recipe. Normally I add 2 tsp of dried yeast to 450 g of Bakers' Magic Gluten free flour if I were to half this amount would I see a difference in hole formation in the resulting bread?
In this experiment I wanted to make holes as such I didn't fully mix the dough (I could feel a few lumpy bits). Basically I made 2 dough one with 2 tsp of yeast & the other with 1 tsp of yeast. To try & keep everything else the same between the two dough I proofed 1/2 of each of the dough in the same baking tin (I used 2 tins). The dough in one baking tin was proofed for 40 mins & the other for 1.5 hours.
The first photo is of bread made with 2 tsp of yeast & proofed for 40 mins (it was a little cold in the kitchen). There are a few little holes but I see these as acceptable.

The next photo is of the bread made using 1 tsp of yeast.

The holes in the above photo remind me of Zeros (point 3 above). Have these holes formed simply because the dough hasn't proofed for long enough given the amount of yeast used? The other half of both dough was proofed for 1.5 hours. Below is the bread made with 2 tsp of yeast.

The following photo is the bread made with 1 tsp of yeast. It certainly looks better than the corresponding bread proofed for 40 mins.

One way to decrease hole formation due to lack of viable yeast is by pre-incubating the yeast with a little sugar & warm water prior to making the dough.
Use an active leaven/mother culture if you are making a sourdough loaf.
7. Drying out of the top of the dough
Part of my routine when making bread is putting a pan full of hot water in the bottom of my oven. When it comes to proofing the dough my oven is warm & moist & the top of the dough is less likely to dry out. I also usually oil the top of each loaf and this will stop the top of the dough from drying out.
What happens if you do neither? (and use 1/2 the amount of yeast, don't mix it well, put too much of the dough in a baking tin & don't prove it for as long as it should). I seriously wanted holes to form.
The following photo is of a bread made with 1 tsp of yeast, proofed for 35 mins (on the same cold day as the breads from no. 6) with oil on the top of the loaf but no pan of water in the oven.

I wanted holes & I certainly got them. These holes may dissapear with the addition of more yeast & a longer proofing time. The following photo is of bread made at the same time as the one above the main difference is that the top of the dough was not oiled.

It's a great hole, the one below the crust. I can't say for certain that these type of holes form because the top of the dough has dried out. I would love to hear from you if you routinely make bread that has the "Flyaway crust" hole & you oil the top of the dough & proof the dough in a moist environment (Contact Page).
8. The direction of the heat source during baking
My oven is a commercial oven that has the heat source on the right hand side & a great fan that distributes the heat quite well. There is one major hot spot at the left front & there may be a slight difference between racks so I tend to rotate the tins when I'm making bread. I love my fan forced oven but sometimes in summer it is simply too hot to bake in the kitchen. My alternative baking oven in summer is a Weber Family Q BBQ. It is not fan forced, the heat comes from below, I can't be certain of the temperature & if I open the lid the temperature drops immediately (sometimes I do have a look). Still I wanted to know what the bread looks like when I bake it on the Weber.
I hadn't made bread that has the "Gaping mouth" hole before baking bread on the Weber. For breads baked on the Weber I don't get this type of hole all the time but I see it often. I am assuming that the heat from below helps these types of holes to form. The photo below was a single loaf baked on the Weber.

The following photo is of two loaves baked on the Weber standing side by side (there wasn't much room between the tins). One loaf has the "Gaping mouth" hole whereas the other loaf has a similar sized hole further up. After seeing these holes I decided to only bake one loaf at a time on the Weber.

9. The way it is mixed
Sometimes I get feedback/queries from customers who are having trouble making bread without a hole. Usually I will get them to send in a photo of the bread so that I can see what the hole looks like & then I will try and work out possible causes. One customer was not having much luck; he adjusted the proving time, oiled the top, pricked the top, had moist proving conditions all to no avail - the bread would come out with a hole in it. I was stumped & he was very frustrated. After giving bread making a break for a while he expressed his frustrations to a work colleague who told him she always uses a dough hook and mixes the dough at a low speed. He tried it & apparently had a wonderful loaf of bread.
Although I prefer mixing the dough in my Thermomix or my stand mixer with a flat paddle, as these methods seem to work best for me, a dough hook may work for you.
Glug
Glug is essentially dough without any leavening. Like holes, Glug can form for different reasons & some of the reasons are the same.
1. The yeast weren't viable
2. The hydration percentage was too high
3. Insufficient mixing of the dough
4. The dough was proofed for too long
5. The bread wasn't baked in a suitable pan
6. The freshly baked bread was too hot when it was cut
1. The yeast weren't viable
If the yeast aren't alive then there is no leavening agent in the mix. I prefer to start the yeast in water with sugar as you can find out pretty quickly (~ 5 min) that the yeast are okay, additionally it allows for a good dispersion of active yeast in the dough during mixing.
2. The hydration percentage was too high
Care needs to be taken when baking breads with greater than 140% hydration (this equates to 630 ml of water per 450 g of Bakers' Magic Gluten free flour). The higher the hydration percent the increased possibility of Caverns forming (See Holes above). There is usually Glug associated with Caverns. Hydration percentages are discussed in the section on Water.
3. Insufficient mixing of the dough
As stated above insufficient mixing of the dough can result in bread that contains some glug & some holes. Their position in the final product can be anywhere. The dough needs to be uniformly smooth. If some of the dough is "harder" than the rest the dough hasn't been mixed enough. In the baked product the harder dough will be glug. It is unlikely that insufficient mixing will occur when the dough is mixed in a Thermomix.
4. The bread wasn't baked in a suitable pan
Refer to Holes - The shape & size of the pan relative to the amount of dough present.
5. The freshly baked bread was too hot when it was cut
Of all the reasons for the formation of Glug I think this is the worst. You have this beautiful freshly made bread, it smells so good you can almost taste it. So you decide to cut into it while it is still hot. Big mistake! The carbohydrates that give structure to the bread haven't set yet. The bread will partially collapse starting from the cut site. Don't be tempted, let the bread cool down. It can be warm, but not hot. If you want hot bread let the bread cool down completely. Reheat it in the oven & then cut into it. I was baking Turkish Pide, it looked fantastic when I took it out of the oven. Unfortunately when I lifted it out of the cast iron baking pan I dropped it. I turned the bread over & there was a gapping hole in the bottom crust. The bread on top of the hole & surrounding it had already collapsed. Around the hole glug was the result (photo below). I was very dissapointed - but we still ate the rest of the bread. 