
Cheese Sticks
")
Crisp, buttery and absolutely delicious. Put these very moreish cheese sticks on a cheese platter and no one will know they are gluten free. My daughter had a couple of friends over to celebrate finishing of their school exams, they snaffled these up in no time. One commented they were better than the ones you can buy - she was referring to wheat based cheese sticks.
I've made a batch of these with the whole amount of yeasted puff pastry, half the amount as well as rolling up scraps of the pastry when I've made other things.
These are best made in a relatively cool kitchen.
This recipe was designed specifically to be made with Bakers' Magic gluten free flour. The finished baked product will not be the same if you use another gluten free flour and you will need to adjust the recipe, particularly if the flour you're using contains rice flour.
Ingredients
400 g Bakers' Magic Gluten free flour
45 g Sugar
2 tsp Yeast
1/4 - 1/2 tsp Salt
150 g Boiling water
270 g Water (bit cooler than room temperature)
50 g Melted butter
Extra BM gf flour
Butter Block
~330 g Butter at room temperature
50 - 150 g Good quality Parmesan cheese finely grated (microplane is best)
Egg Wash
1 Egg
~1/2 tsp Salt
Method
If you want to make a small batch first use scraps of dough (method at page end).
Finely grate the parmesan cheese. Use a microplane if you have one.
For warm water add together the boiling water and the cooler water.
Pre-incubate the yeast at room temperature for approximately 5 - 8 mins in 100 g of warm water containing 15 g of sugar. Stir the mixture to dissolve the sugar & disperse the yeast. This gives the yeast a readily available food source & they can "revive" in a relatively undisturbed environment. After the allocated time the surface of the yeast mixture should be slightly frothy. This indicates the yeast are viable.
Stand mixer - can also be mixed by hand but it is a bit hard getting all the lumps out. I've made it a couple of times in a Thermomix however the resulting pastry tends to be slightly harder & not as crisp. My preferred method is using a stand mixer.
Mix together the Bakers' Magic Gluten free flour, 30 g of sugar & salt in a bowl.
Melt the butter. Add the remaining warm water to the butter.
Usually I add the water/butter to the bowl then add the flour blend. I find the lumps are easier to get out & there is less flour stuck to the bottom of the mixing bowl.
Pour the butter/water into the mixing bowl and add in the flour. Mix on low/medium speed until the flour is incorporated. Increase the speed and mix until the dough is uniform.
Cover the top of the mixing bowl to stop the dough from drying out and put the bowl in a warm spot for 15 to 20 mins.
Transfer the dough out of the mixing bowl. It should have risen a bit.
Put the dough onto some water proof wrapping (plastic clingfilm, bees wax wrap), flatten, cover completely & put in the freezer for approximately 30 mins. I usually put the timer on for 15 mins then turn the dough over & give it another 15 mins. We want the dough to be cold but not frozen (been there done that).
While the dough is in the freezer turn on the oven to 170 - 180 C (it will depend on your oven).
Use some of the extra Bakers' Magic Gluten free flour to lightly flour a clean work surface & rolling pin. If you have a pastry mat put a piece of A4 paper underneath it - you'll use it as a guide when rolling out the dough.
Transfer the dough to the floured surface. Put a little flour on the top.
The dough is going to be rolled out & folded (6 single turns - check out Information - gluten free flaky pastry) BEFORE the butter block is added. For photos of the method visit Yeasted gf Puff Pastry.
Roll out the dough into a rectangular shape the size of the A4 paper. I usually lift the dough up every now & then & put a bit more flour to prevent it sticking to the work surface.
Fold in one long side of dough approximately one third, fold the other long side over the top. This is a 'single turn'.
Turn the folded up dough 90 degrees and roll it out to the size of the A4 sheet. Repeat the folding up. This is the second single turn. If the dough is a little sticky put a little flour on top & then brush off the excess. Repeat the folding & rolling out for another 4 single turns.
Has the dough been out of the freezer for more than 15 mins, if so put it back in the freezer for another 5 mins.
Adding the butter block
Roll out the dough to the size of an A4 piece of paper.
Put the butter between 2 sheets of baking paper. The butter should be soft(ish).
I usually whack it with a rolling pin to make it thinner. I then shape the butter between the baking sheets with my hands or fold it over. Essentially the butter needs to be soft enough to be folded.
We want the butter to be 2/3rds of the size of the dough (a 250 g butter block wrapper is about the right size).
Take off the top layer of baking paper & place the butter block on to the left hand side of the rolled out dough. Remove the bottom piece of baking paper that is now on the top of the butter.
Fold the right hand side of the dough (no butter on it) over the middle third of the dough. Repeat with the either side.
Ensure that all butter is encased in dough. If it isn't pinch/stretch some of the dough to enclose the butter.
Turn the dough 90 degrees and roll out to the size of an A4 piece of paper.
Fold & roll out the dough for another 3 'single turns'. If the dough gets sticky add a little of the extra flour, brush off any excess.
Roll out the dough to the size of an A4 piece of paper.
Brush 2/3s of the dough with egg wash.
Sprinkle the Parmesan over the egg washed dough. It doesn't matter if it spreads on to the other 1/3.
Fold the 1/3 of the dough without the cheese on it over to the middle, then roll that 1/3 over the remaining 1/3.
Turn the dough 90 degrees and roll out to the size of an A4 piece of paper.
Fold & roll out the dough for another single turn.
Cut the dough in half. Wrap one half (beeswax cloth or plastic clingwrap) & put it in the fridge.
Roll the dough out to a thickness of 4 mm. Optional - brush egg wash on the top of the dough. The egg washed dough will develop a shiny darker colour during baking. The baked cheese sticks on the left and middle have been egg washed (they were left in the oven a bit too long).

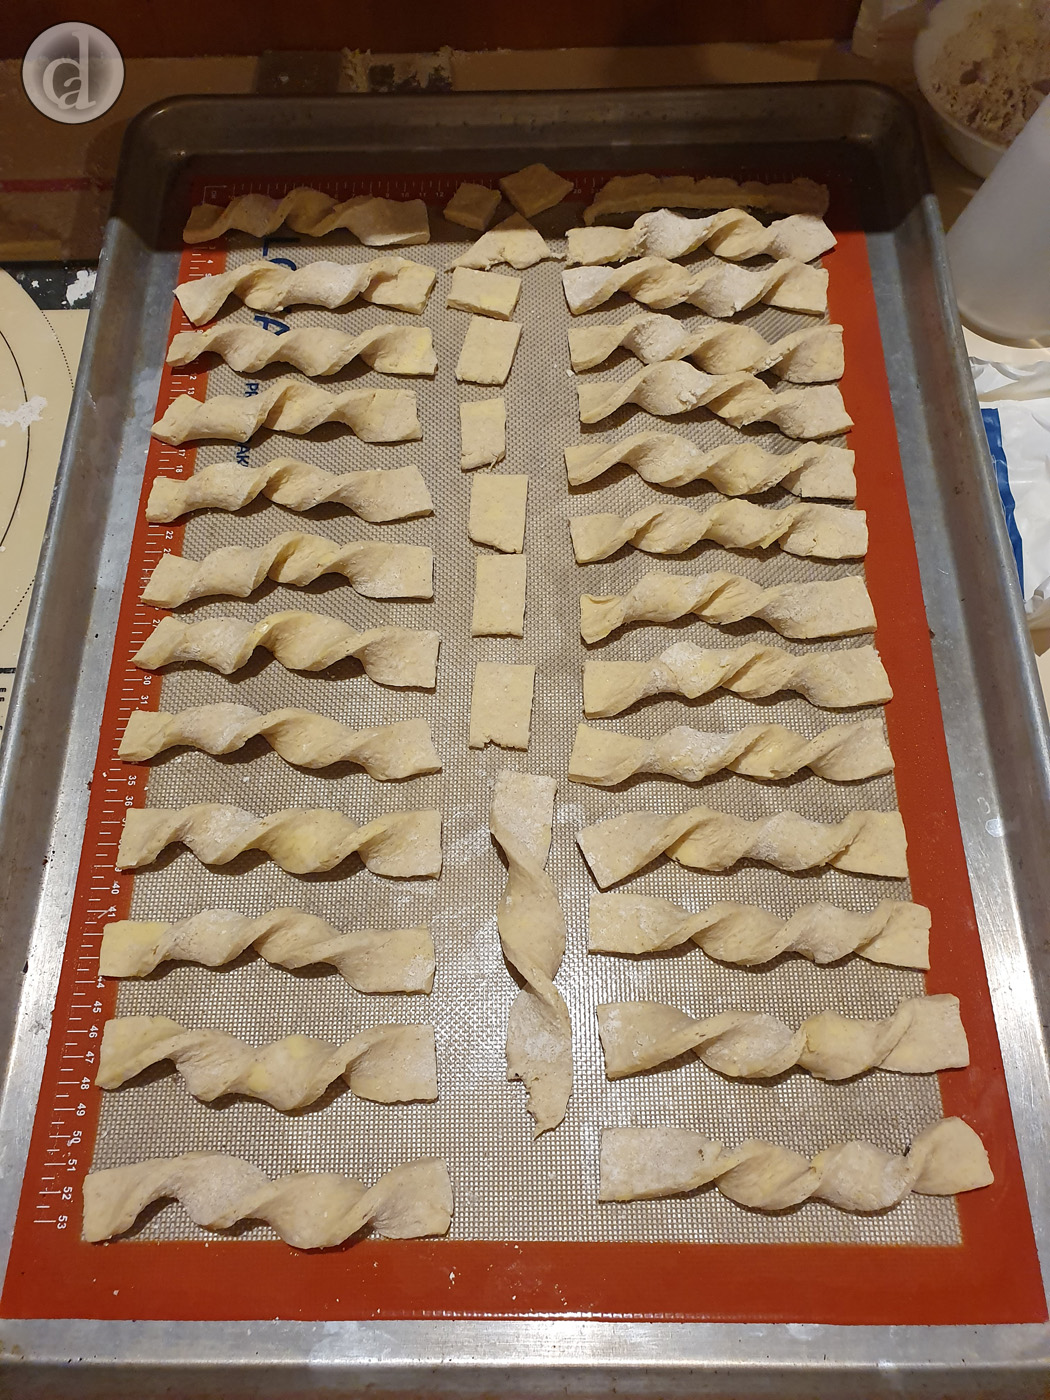
Cut the dough in strips approximately 2.5 cm wide and 15 to 20 cm long.
Line 2 baking trays with baking paper.
Pick up one of the strips, twist it twice (or three times if you can) and put it on a tray. Repeat for the remaining strips. I usually bake the scraps as well.
Rolling out the rest of the dough will depend on the size of your oven (& the number of baking trays you have).
Bake the sticks at 170 - 180 C for approximately 15 - 18 mins. (I suggest you put the tray with the twists in the fridge & just bake a couple so you can work out the timing in your oven).
Turn the oven down to 100 C. Open the oven door for ~5 mins to cool the oven down a bit, then close the door.
Leave the cheese sticks in the oven to dry. I usually bring out a cheese stick after about 45 mins, let it cool down & then eat it to see if its dry (I enjoy this part of the recipe very much).
Store the cheese sticks in an air tight container (& then hide them).
Making cheese sticks from scrap pastry
Sometimes you'll have bits of pastry left over from making a tart or Danish and you might feel that the pastry is too good to waste. It's quite simple to turn them into a few cheese sticks.
These cheese sticks will differ as the dough has already had six single turns.
Lay the scraps down on a pastry mat (or clean work surface) and join them together (as best you can).

Brush egg wash on 2/3rds of the dough and sprinkle finely grated Parmesan over the egg wash.

Fold the 1/3 of the dough without cheese over the middle 1/3, then roll it over the remaining 1/3.
Turn the dough 90 degrees and roll it out to a thickness of ~6 mm. The size will depend on how big the scraps were.
Fold the dough again & then roll it out.
Cut the dough in strips approximately 2.5 cm wide and 15 to 20 cm long.
Line 2 baking trays with baking paper.
Pick up one of the strips, twist it twice (or three times if you can) and put it on a tray. Repeat for the remaining strips.
Bake the sticks at 170 - 180 C for approximately 15 - 18 mins. (I suggest you put the tray with the twists in the fridge & just bake a couple so you can work out the timing in your oven).
Turn the oven down to 100 C. Open the oven door for ~5 mins to cool the oven down a bit.
Leave the cheese sticks in the oven to dry.
Store the cheese sticks in an airtight container.
Simply enjoy :).